SeeShell Automation - User Manual
Getting started
Start by watching the short SeeShell video below. Then run some or all of the included demo macros. This will give you a good feeling of what SeeShell can do. After that, you are ready to record your first macro.
SeeShell is fun to use! But if you have no time to create automation scripts you can buy SeeShell PRO. The license includes 3 hours of custom script creation services to get you started. So you just tell us what you want to automate, and SeeShell tech support creates the macros and scripts for you.
SeeShell Recording
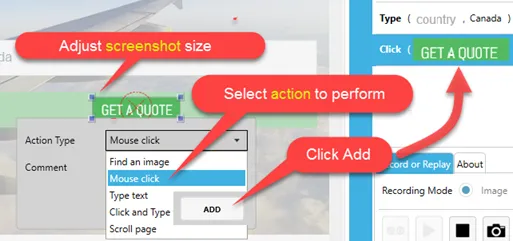
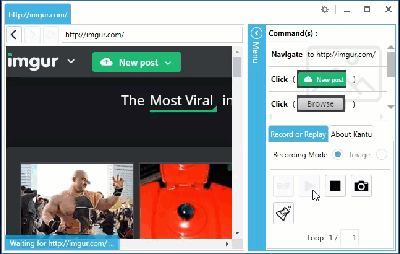
To create your own image macros, click the "tape icon" and the image wizard appears. It helps you to take the screenshots for your macro.
- Resize the screenshot area to fit your button or text box. In general, a smaller screenshot is better and faster.
- Select the action to perform on the screenshot: Click or Click+Type (for sending text to input boxes) . For web testing, there is also Find to assert a certain image is on the screen.
- Click "Add" to record the screenshot and command
- When you are done with recording, click stop.
- Save the macro under a new name.
- Select Play to run your macro.
 Tips:
Tips:- The scroll command allows you to move up and down the screen.
- You can use the "Comment" box to add a note for later
- No worries: Wrongly recorded commands can be removed or changed in the editor after recording
 Top
Top
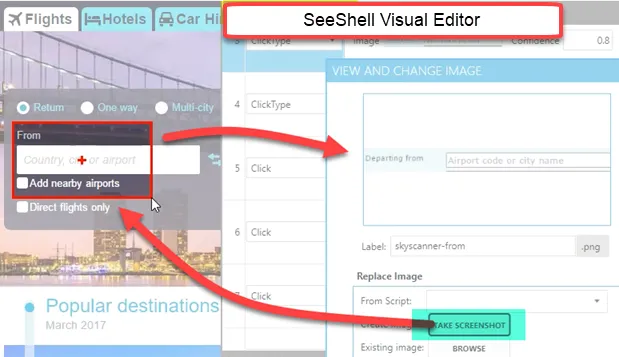
Use the Editor to fine-tune
The SeeShell Editor allows you to add and remove recorded commands, and also to easily rename and change images. For this, it has a built-in screenshot tool.
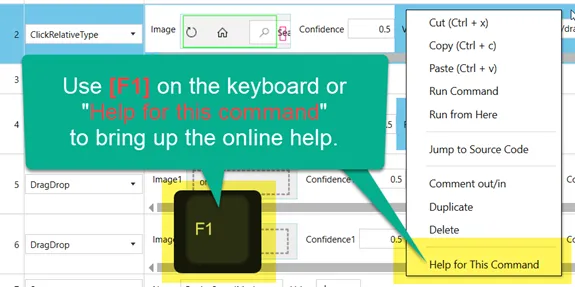
Tip: In the editor, press the function key F1 or select "Help for this command" from the context menu to bring up the online help and information about each command.
Waiting for page loads and images
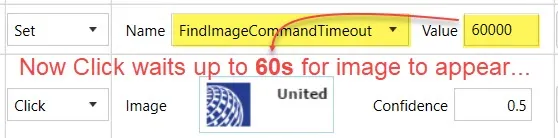
By default, SeeShell waits up to 10 seconds for an image to appear. It does not matter what delays the image appearance. Often, this will be a page load event, but it can be anything, for example some page internal processing that then auto-updates the page. If 10 seconds are too short, increase the value in the SeeShell settings (applies to all macros) or use the SET FINDIMAGECOMMANDTIMEOUT to increase it inside the macro. The new value set by FINDIMAGECOMMANDTIMEOUT is valid for all visual commands (Click, Find and Extract) that follow after the new timeout value has been set.
Automating File Downloads
Just trigger the file download like you normally would do, this time using the image wizard. SeeShell records it by adding a SET DownloadDirectory... value.
TopAutomating File Uploads
Automating web browser file uploads is very easy with SeeShell: Create a click command with the screenshot of the file upload "Browse" button and then select the file you want to upload from the native browser file upload dialog that appears. That is all. SeeShell records path of the selected file and then fills it in during replay. SeeShell works with all file upload methods that you can find on the web (We tested dozens of websites and it worked with all. If you come across any that does not work, contact us.)
Special feature: Folder upload: If you specify a folder name instead of a file name, SeeShell will upload every file in the folder. To do so, set the loop counter (at the very bottom of the right sidebar) to a value > 1. With every macro loop, SeeShell grabs a new file from the folder and fills its file name to the upload box. SeeShell selects the files to upload alphabetically a-z.
TopAutomating Select Boxes
Automating selected boxes can be sometimes a bit tricky. On the one hand there are modern-style select boxes (Example: Gmail sign-up dialog). These can be automated just like any other element on the page.
The tricky part are only the “classic” old-style select boxes. You can detect them as you will be unable to create a screenshot of them with the wizard. And sometimes they overlap the recording wizard once open. And in any case, they look old and very “Web 1.0”.
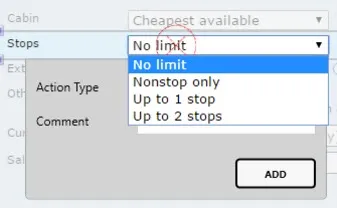
To automate these kind of select boxes you have to use keyboard events: To select an entry from select boxes, please enter {DOWN} to select entries. If you want to select the 3rd entry, then enter {DOWN}{DOWN}{DOWN}. Then send {ENTER}. So the complete sequence looks like
{DOWN}{DOWN}{DOWN}{ENTER}
You can also tell SeeShell to type the first character of an entry. Example: To select Germany in a typical country list, type " G" and then 3-times down:G{DOWN}{DOWN}{DOWN}{ENTER}
Typing “G” will jump to “Gabon” and from there you are only 3 times {DOWN} away from Germany.
Web Scraping/ Data Extraction
The new SeeShell Version has full support for data extraction via the API. For more details, please see the visual web scraping page.
Looping a macro
In web testing you often need to replay a macro more than once. SeeShell has a built-in function for that: Enter the desired number of loops in the field and then press Play. Another method to loop a macro is to use the PLAY command provided by the API and call it for example within a FOR...NEXT loop of your favorite scripting language.
Drag & Drop
The Drag & Drop command can drag anything to anywhere. You mark the point the drag should start (e. g. an icon, an image, a scrollbar) and then the place the drag should end (drag stop). As with other commands, the anchor area is marked with a green frame and the drag start and stop areas are marked with a pink rectangle.

Data-driven testing/automation with CSV files and databases
There are two ways to import CSV data into SeeShell:
(A.) Built-in csvRead command
You add the SET csvRead YourCSVfile.csv to the macro and SeeShell loads it for you. The data from the CSV file is now available in the internal variables ${!COL1}, ${!COL2} and so on. SeeShell loads a new row of the CSV file with every macro loop – so it is important that you set the loop counter (bottom right corner) to a value > 1. Typically, of course, you will pick a loop counter value matches the number of rows in your CSV file. Related demo macro "Demo-csvRead". It shows how to use a CSV file to populate multiple form entries.(B.) Use the Scripting API [PRO]
This approach gives you the most flexibility. You can use the API not to read data from CSV file, but from any datasource (SQL, Access, ODBC,….). To do so, use the API to send data to SeeShell. A VBS example script that reads from a CSV file and sends the data to SeeShell for form filling is in our SeeShell API GitHub repository.
Note that while CSV files (CSV is a comma separated values file) are the most popular way to store and read data, the API allows you to connect SeeShell with databases or any other datasource as well.
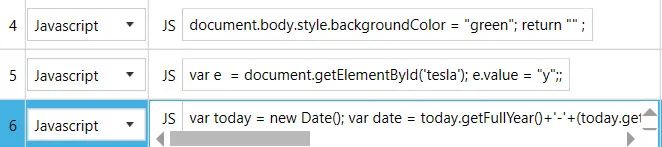
Execute JavaScript (Content Scripts) [Browser only]
Sometimes visual automation is not enough, and you need to query website elements directly. Or you need the power of Javascript to generate custom values like "Yesterday's date" or "Random number between 200 and 250". SeeShell includes the Javascript command for such tasks. It allows you to do everything JavaScript can do, but inside the visual SeeShell macros. As SeeShell builds on Google Chromium, its Javascript command is compatible to Chrome content scripts. Run the "Demo-Javascript" macro that ships with SeeShell to see some scripts in action.
Example 1: Simulate a BACK button click with window.history.go(-1);
Example 2:Set a select box to a certain value:
var e = document.getElementById('tesla'); e.value = "y";
Example 3: Get today's date:
var today = new Date(); var date = today.getFullYear()+'-'+(today.getMonth()+1)+'-'+today.getDate(); var time = today.getHours() + ":" + today.getMinutes() + ":" + today.getSeconds(); var dateTime = date+' '+time; return dateTime;.
The return value of the script is available with the ${!JSRESULT} internal variable.
Adobe Flash testing/automation
SeeShell's visual approach is ideally suited for automating and testing Flash applets. To get started, you only need to install the latest Adobe Flash Player. This takes less than one minute, please follow the instructions here.
TopCommand Line Options
You can run SeeShell from the command line/batch file:
- SeeShell.exe macro.see => opens SeeShell and runs macro.see. SeeShell stays open after the macro is completed.
- SeeShell.exe macro.see -ae => opens SeeShell, runs macro.see, and then closes SeeShell (ae = and exit). This is the recommended syntax if you start SeeShell from a task scheduler.
- Kantueditor.exe macro.see => opens macro.see in the SeeShell Editor
Use the SeeShell Browser Scripting API [PRO]
For more complex automation, there is the SeeShell Browser API. It can be used from any programming or scripting language. Some VBS and PowerShell sample scripts are included. As a start, run them to see what the API can do.
With open you launch SeeShell instances, and with play you run the image macro. All commands return detailed status and error information at runtime. Tasks you can use the API for include "if/then" decisions, reading form-filling data from a text file ("data-driven testing") or storing extracted information in a database.
- Browser Scripting API Example code on GitHub:
- - Batch File (SeeShell command line)
- - C# (Visual Studio Project)
- - Powershell
- - Java
- - VBS (Visual Basic Scripting)
- See also the FAQ: How to create IF THEN ELSE statements with SeeShell?.
- SeeShell also works with any other programming or scripting language. Contact us if you need some help getting started.
For more details see the API command reference below.
TopJenkins Integration
How to integrate SeeShell visual testing with Jenkins:
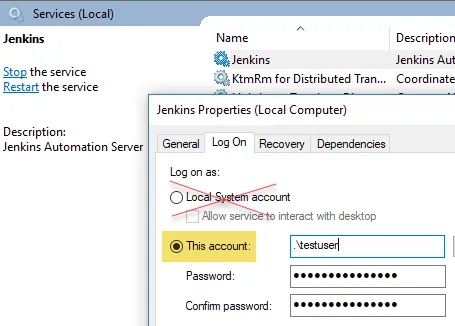
First - as with launching any UI-based Windows app from Jenkins - make sure that the Jenkins service runs under a normal user account and not the local system account, which is the default. Alternatively, launch the build process on a second machine via a Jenkins slave node.
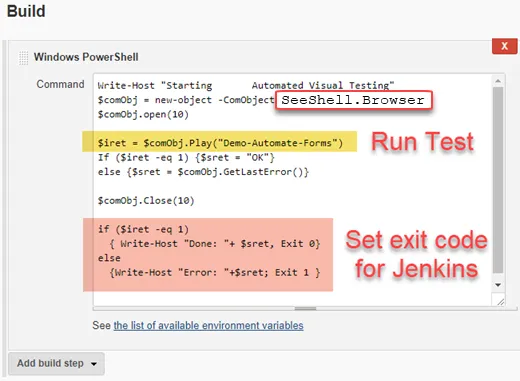
In this example we use Powershell and the Jenkins Powershell plugin to open the SeeShell browser, run the test case (Play) and then close the browser again. The only special command for Jenkins is the last line, where we set the exit code to 1 (if error) or 0 if the test was successful. This is done to integrate with the Jenkins reporting where 1 means error. As you know, in the SeeShell API it is just the opposite and a return value of 1 means success. Because the SeeShell API is a standard windows COM object, you can use any other scripting language instead of Powershell. Some Jenkins/SeeShell users also use a small C# app to control SeeShell via the API, and then launch this app from Jenkins as batch file. The SeeShell tech support can help in case of any problems.
TopSeeShell - FAQs
TopIs using SeeShell safe with confidential data? [YES]
SeeShell is classical software and runs locally. So your confidential data is safe - it never leaves your PC in any other way than a regular browser does. For more details on this and on our very strict approach to privacy, please see our privacy policy page.
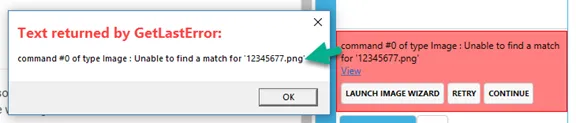
What does "Confidence level" mean?
This term has nothing to do with data privacy but is a term used for image matching. Another, maybe better name for it is ''similarity score'' (and we will change to that name with the next update). => What it means is the similarity between the input image (e. g. the button image) and the best found match on the website. A score of 1 means perfect match, and a score of, say 0.8, allows for some deviation between the images The image search algorithm scores every possible match with such a score. And if you set the similarity score threshold e. g. to 0.8, but the best possible match found is only 0.78, then SeeShell will report this as "image not found" error. On the other hand, if the best possible match found is 0.83, then all is fine and SeeShell will click the button and continue.
Why is this needed? Technically images are rarely rendered exactly the same between two machines. There are artifacts from the JPG compression, browser rendering, screen resolution or the image you are clicking changes a slightly different shade during mouse over. So the goal of the employed pattern matches algorithms that SeeShell considers an image "the same" if a human would say it is "the same".
For example, an image that has a similarity score of 0.95 on your regular work PC might have the same score inside a VM on the same PC, but only a similarity score of 0.56 on a Surface Tablet with its High-PPI screen. In other words, a confidence 0.5 is usually a very good and stable default value.
TopHow to create IF THEN ELSE statements with SeeShell?
Community and PRO Edition: The Javascript command allows you,
among many other things, to make if/then decisions within the command.
Example: var hour = new Date().getHours();if (hour >= 9 && hour < 18) { text = "store open"} else { text = "store closed"}; return text;
PRO Edition: SeeShell separates the linear website flow logic (the SeeShell screenshot macro) and the programming/scripting logic via the Scripting API. So for tasks like conditional statements, the Scripting Interface is the best solution. The PLAY command always returns detailed status and error information, and use can use this to base your IF/THEN/ELSE decisions on:
IntegerReturnValue = objSeeShell.Play ("macro1")
if IntegerReturnValue = 1 then
'Do something
MsgBox "OK!"
else
'Do something else
IntegerReturnValue = objSeeShell.Play ("macro2")
end if
This example uses the VBS/Visual Basic syntax, but you can use any programming or scripting language with the Scripting API.
How do I add additional steps to an existing recording?
You can use the SeeShell Editor to copy & paste lines between macros: So you would first record macro A, then record the additional steps as macro B, and then copy & paste some or all lines of it into macro A.
TopCan SeeShell run in headless mode? [YES]
Unlike most other visual automation solutions, SeeShell Web Automation runs fine in headless mode (no physical monitor connected). This feature comes out-of-the-box, it requires no special settings or setup. Just start SeeShell via command line or API. This also means that SeeShell automation runs just fine on disconnected RDP (remote desktop connection) sessions, behind a Windows lock screen, inside VMware/Vbox/HyperV virtual machine or when started by the Windows task scheduler.
Web testing specific FAQs are on the web testing FAQ page.
TopSeeShell Command Reference
This chapter lists all SeeShell macro commands.
The .see file format
The compressed SeeShell macros (.see file extension) are standard zip files. If you rename *.see to *.zip you can open and edit them in Windows Explorer or any other file manager. Some file managers such as Total Commander are even smart enough to let you open the .see files without renaming the extension first. A SeeShell macro consists of a .json file with the macro commands and the corresponding images in .png or .jpg format (.png recommended).
Click (and Double-Click, Right-Click, Shift-Click, Ctrl-Click)
Find the target image and click in the center of it. As any command that takes an image as input, the CLICK commands waits until "timeout" for the image to appear. The default is 12s. You can change the value either globally in the settings dialog or inside the SeeShell macro with SET FindImageCommandTimeout (new time). Also, by default all image commands search only on the visible part of the screen for a better performance. You can change this by adding SET SearchImageInWholePage "true" to the macro. The Right-Click command works the same, but simulates a mouse-right-click. Typically websites like Google Docs use right-clicks to open context-sensitive menus.
If you want to find an image and click not in center, but somewhere else, then use relative click method.
Relative Clicks with Green/Pink Boxes
Relative clicks allow you to click on something relative to something to something else. The idea is always that you find something (easy to locate) and then click on a often changing, very small or not unique element next to it. Or you find a label and then click in the input box to the right/left/top/below of it. Using Relative Clicks helps to create very stable automation scripts.
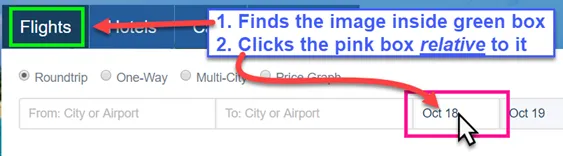
Screenshot: Using relative clicks.

Macro code for relative clicks. Use TYPE to send text to the last click position.
Click & Type
This combines a Click and a Type command into one command. Typically this is used with input boxes. It finds the target image, click in the center of it and sends text and/or any of the special key codes listed below. So technically it is the same as first sending a Click and then a Type command. But since this combination is used very often, it has its own command.
SeeShell Special Keys [Desktop]
SeeShell [Desktop] automation implements all Windows special keys and shortcuts:
Use ClickAndType and Type to send keystrokes and keystroke combinations to the active application.
Note that the plus sign (+), caret (^), percent sign (%), tilde (~), and parentheses () have special meanings. To specify one of these characters, enclose it within braces ({}). For example, to specify the plus sign, use "{+}". To specify brace characters, use "{{}" and "{}}". Brackets ([ ]) have no special meaning, but you must enclose them in braces.
To specify characters that aren't displayed when you press a key, such as ENTER or TAB, and keys that represent actions rather than characters, use the codes in the following table.
| Key | Code |
|---|---|
| BACKSPACE | {BACKSPACE}, {BS}, or {BKSP} |
| BREAK | {BREAK} |
| CAPS LOCK | {CAPSLOCK} |
| DEL or DELETE | {DELETE} or {DEL} |
| DOWN ARROW | {DOWN} |
| END | {END} |
| ENTER | {ENTER} or ~ |
| ESC | {ESC} |
| HELP | {HELP} |
| HOME | {HOME} |
| INS or INSERT | {INSERT} or {INS} |
| LEFT ARROW | {LEFT} |
| NUM LOCK | {NUMLOCK} |
| PAGE DOWN | {PGDN} |
| PAGE UP | {PGUP} |
| PRINT SCREEN | {PRTSC} (reserved for future use) |
| RIGHT ARROW | {RIGHT} |
| SCROLL LOCK | {SCROLLLOCK} |
| TAB | {TAB} |
| UP ARROW | {UP} |
| F1 | {F1} |
| F2 | {F2} |
| F3 | {F3} |
| F4 | {F4} |
| F5 | {F5} |
| F6 | {F6} |
| F7 | {F7} |
| F8 | {F8} |
| F9 | {F9} |
| F10 | {F10} |
| F11 | {F11} |
| F12 | {F12} |
| F13 | {F13} |
| F14 | {F14} |
| F15 | {F15} |
| F16 | {F16} |
| Keypad add | {ADD} |
| Keypad subtract | {SUBTRACT} |
| Keypad multiply | {MULTIPLY} |
| Keypad divide | {DIVIDE} |
To specify keys combined with any combination of the SHIFT, CTRL, and ALT keys, precede the key code with one or more of the following codes.
| Key | Code |
|---|---|
| SHIFT | + |
| CTRL | ^ |
| ALT | % |
To specify that any combination of SHIFT, CTRL, and ALT should be held down while several other keys are pressed, enclose the code for those keys in parentheses. For example, to specify to hold down SHIFT while E and C are pressed, use "+(EC)". To specify to hold down SHIFT while E is pressed, followed by C without SHIFT, use "+EC".
To specify repeating keys, use the form {key number}. You must put a space between key and number. For example, {LEFT 42} means press the LEFT ARROW key 42 times; {h 10} means press H 10 times.
The SeeShell [Browser] Special Keys
The SeeShell browser supports (only) special keys are useful within a web application:
- {DOWN} and {UP} - Useful to move through values in select boxes or to scroll inside frames/iframes
- {ENTER}
- {TAB} - Use it to jump between input fields
- {LEFT} and {RIGHT}
- {BACK} - Delete pre-filled characters
- Need other values? Please ask tech support.
Drag & Drop
Drag and drop is explained here.
Extract
Extracts data from the website. The data is returned via the API interface. For more details see the Extract documentation.
Find
Use Find to verify that the target image is loaded. Often this kind of check is also called assert. Just like Click command, find waits until the image is loaded (success) or until the timeout is reached (fail).
Javascript [Browser]
Execute Javascript on the loaded web page. Great for accessing the DOM and making basic IF/THEN decisions.
LimitSearchArea
This command limits the search area for all following image commands until a new LimitSearchArea defines a new area or the macro ends. A green rectangle in the image defines the anchor image to be searched, and the pink rectangle visually indicates the new search area. To reset the search area to the whole browser screen, use LimitSearchArea set to "Viewport".

The advantage of using LimitSearchArea is to speed up the image search (smaller area to search). It can also make a macro more stable, as a smaller area also means less "space" for false matches.
Navigate (URL) [Browser]
Loads a website. SeeShell does not "wait" for a website to be loaded. The "waiting" is implicitly done by the image recognition of the FIND or CLICK commands.
Screenshot
This commands takes a screenshot of the website and saves it to file. The options are "full" (whole page) or "partial" (visible part).
Scroll [Browser]
This commands scroll the page up or down. Why is this useful? By default, the image recognition of SeeShell operates on the visible part of the screen, so by scrolling up or down you can reach other parts of the website.
-
Values:
- Top - scroll to top (~ "Home" key for humans)
- UpPage - scroll one page up (~ "Arrow Up" key)
- UpHalf - scroll half page up
- DownHalf - scroll half page down
- DownPage - scroll one page down (~ "Arrow Down" key)
- Bottom - scroll to the very end (~ "End" key)
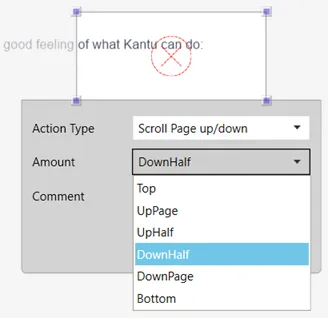
Screenshot: Recording the SCROLL command with the recording wizard.
You can change image search area with the SearchImageInWholePage parameter. It is set to false by default (ie. only the visible part of the page is used).If you want to set it so the image detection use the whole page during
Scrolling inside a frame/iframe/popup
The regular SCROLL command always works (only) on the scroll bars of the main website (example: Scrolling on Google News). It does not scroll pages that are inside a frame or iframe. For example, the a9t9 Twitter applet on the Online OCR Status Page is a typical example where a list (here the list of tweets) is embedded into an iframe.
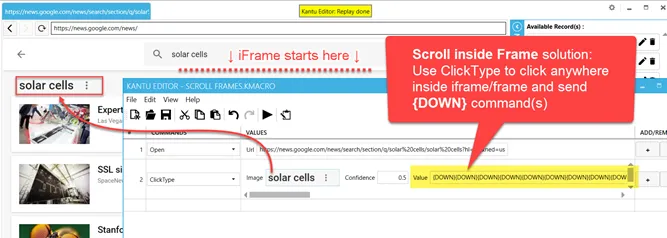
Screenshot: Scrolling pages inside a frame or iframe
Solution: Use the ClickType command to send a sequence of {DOWN} keycodes to the page inside the frame. To do so, make the ClickType command click on any place inside the iframe so the frame receives the key sequence. If you want to scroll to the bottom of the list, then you might have to send 20 more {DOWN} to reach the bottom. But this is no problem... adding a few extra {DOWN} does not hurt, this way you can make sure you always reach the bottom. The screenshot above clarifies this further.
SET (Parameter, value)
This commands sets internal values for the SeeShell replay engine. Values set inside a macro override global values. For example, if the global replay speed is set to "Slow", a SET ReplaySpeedMode = FAST will overwrite the value for the macro itself, but not change the global setting. Do not confuse this command with the API command setVariable.
- csvReadSpecify the CSV file to read data from. The number of columns is auto-detected. The data is available in the ${!COL1},{!COL2}...${!COL9} variables.
-
DeleteAllCookies - [Browser] Removes all cookies. Note that some cookie types are only really gone after a browser restart. (You can automate a browser restart via the SeeShell API.)
If you want to remove absolutely every data that the SeeShell Chromium Browser stores, manually delete its cache. You find it at C:\Users\***your user***\AppData\Local\Temp\SeeShell\cache. Delete the \cache folder and restart SeeShell. - DownloadDirectory (string) : The path where the downloaded files should be stored during a record/replay. It overrides the global value set in the app settings.
- ReplaySpeedMode - Fast. Medium or Slow. This overrides the global settings for the specific macro
- ErrorIgnore (true/false). If set to true, SeeShell continues the macro execution after an error (e. g. after an image is not found). This is very useful to click on buttons that are only sometimes on the screen.
- ExtractAdd Adds a custom value to the list of extracted data. You can add for example the JS return value ${!JSRESULT} or any other internal value to your extracted data. This way you can return such data to the calling script. It will be returned via the GetExtractImageData command just as any other extracted data.
- FindImageCommandTimeout (int) : Wait for image to appear on website" Timeout, in ms, to use for every IMAGE commands during a replay. It overrides the global value set in the app settings.
- Proxy: [Browser] Sets a new proxy for the browser in the format IP:PORT|username(optional)|password(optional). This proxy overrides any global settings and is only valid for this macro run. It overrides the global value set in the app settings.
- SearchImageInWholePage (boolean): [Browser] It is set to false by default (ie. only the visible part of the page is used). If set to "true" the whole website is used for the image detection. This applies to all image related commands (CLICK, CLICKTYPE, EXTRACT, FIND). [PRO Edition feature]
- Useragent (string): [Browser] As the same suggests, this sets a new user agent string. This overrides any global settings and is only valid for this macro run. It overrides the global value set in the app settings.
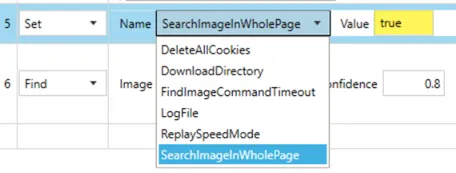
The screenshot shows the SET command dropdown box inside the SeeShell Editor.
Open [Browser]
The OPEN command tells the Chromium browser engine to load a website. The command does not wait until the page is loaded. This is an important difference to, for example, the OPEN command of Kantu. SeeShell does not need to wait, as it operates visually.
Mouse (x, y, mouse event)
The MOUSE command sets the mouse cursor to a certain X/Y position and simulates a mouse move, mouse over, mouse down or mouse up event. The MOVE command does the same, but uses an image instead of X/Y coordinates.
Move (image, mouse event)
The MOVE command finds the input image, and sets the mouse cursor to the middle of this image, and then simulates a mouse move, mouse over, mouse down or mouse up event. The MOUSE command does the same, but without image search.
MoveRelative (image with green/pink box, mouse event)
The MOVE command finds the image inside the green rectangle, and then sets the mouse cursor to the middle of the PINK box, and then simulates a mouse move, mouse over, mouse down or mouse up event.
For more information about the green/pink box concept for relative commands, please see ClickRelative. Both commands are very similar, the difference is that ClickRelative simulates a click event and MoveRelative simulates a mouse event. (Of course, technically a click event is nothing else than a series of mouse events, but for pratical purposes it makes good sense to have separate commands for both.)
Type (text)
The TYPE command simulates keystrokes. Please see the ClickType command for more details. The TYPE command works the same, but does not search for an image first. So the keystrokes are sent to whatever input box or page element (in case of SeeShell Browser) or Windows app (in case of SeeShell) has the focus.
ClickRelativeType (image with green/pink box, text)
The ClickRelativeType command combines the ClickRelative command and the Type command in one command. The reason for this is that to click somewhere and then type a text is a very basic robotic process automation (RPA) building block, and it is convenient to have one command that does both at once.
Download (deprecated)
SeeShell now handles downloads fully automatic. This command is no longer required.
Mouse
The MOUSE command sets the mouse cursor to a certain X/Y position and simulates a mouse move, mouse over, mouse down or mouse up event.
Size [Browser]
Resizes the SeeShell Chromium browser. Note that WindowState, BrowserWidth and BrowserHeight are all deprecated values and will disappear with future updates. In other words, WindowWidth and WindowHeight are the only values used. They resize the main browser window, and this in turn automatically adjust the viewport size (BrowserWidth and BrowserHeight).
Wait
Waits x milliseconds. It is not required to use Wait with the image commands.
Tab | Switch=0,1,... / OPEN (url) / CLOSEALLOTHER
The TAB command allows SeeShell to control the Chromium browser tabs.
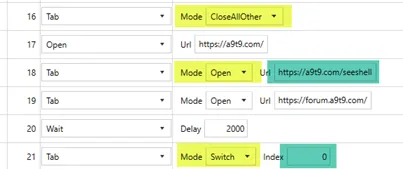
- TAB | Switch (0,1,2...) Switches to the browser tab with the given index number. The tab numbers start with 0, so 0 means the tab on the very left side.
- TAB | Open (url) Open a new tab with the given URL.
- TAB | CloseAllOther Closes all tabs except the current one. So the current tab becomes tab number 0.
Related demo macro: Demo-Tabs.see
TextFind (text) [available soon]
TextFind uses OCR to search for text on the screen. So it works like Find, but searches for text instead of an image. This command will be available with the SeeShell October OCR update. If you are interested in beta testing this feature, please contact us.
In the Community Edition the OCR features use an online ocr api. In the PRO and PRO Plus Edition the software includes the OCR Engine and the OCR processing runs 100% locally on your machine, no internet connection required.
TextClick (text) [available soon]
TextFind uses OCR to search for text on the screen and then clicks it. So it works like Click, but searches for text instead of an image. This command will be available with the SeeShell October OCR update. If you are interested in beta testing this feature, please contact us.
TextClickType (text to search for, text to send) [available soon]
TextClickType works like Click And Type, but searches for text instead of an image, but searches for text instead of an image. This command will be available with the SeeShell October OCR update. If you are interested in beta testing this feature, please contact us.
TextClickTypeRelative (text to search for, shift parameter, text to send) [available soon]
TextClickRelativeType works like ClickRelativeType, but searches for text instead of an image. This command will be available with the SeeShell October OCR update. If you are interested in beta testing this feature, please contact us.
TextMoveRelative (text to search for, mouse event) [available soon]
TextMoveRelative works like MoveRelative, but searches for text instead of an image. This command will be available with the SeeShell October OCR update. If you are interested in beta testing this feature, please contact us.
Unknown (various parameters)
As the same suggests, the SeeShell Editor displays "Unknown" if it finds a command inside the JSON that it does not know. If this happens, please contact support or ask in the forum.
List of internal variables
Internal variables expose some SeeShell data for use inside your macro and Javascript. Most internal variables are "read-only", unless explicitly mentioned. Do not confuse these internal variables with the API command setVariable, that allows you to create your own variables to send data to SeeShell macros.
- ${!BOX1}... ${!BOX9} - content of the last pink frame(s) of an EXTRACT command. Use it, for example, to fill extracted data back into a form.
- ${!COL1}... ${!COL9} - content of CSV file (read line by line during loops)
- ${!FILE.UPLOAD} - name of file the select for upload. Useful if you use the folder upload feature and want to fill in the current file name somewhere. ${!FOLDER.DOWNLOAD} - location of the SeeShell download folder, typically C:\Users\(user name)\Documents\SeeShell\download.
- ${!JSRESULT} - return value of the last Javascript command
- ${!MACRO.NAME} - name of the running macro. Useful, for example, as part of file names
- ${!LOOP} - number of the current loop. Starts with 1 (not 0)
- ${!PASTE} - content of the clipboard
Important: Internal variable names must be UPPERCASE.
SeeShell API Reference [PRO]
This chapter lists all commands that are available from the SeeShell scriting interface (API).
Example code/scripts for using the API with C#, Java, Powershell, Python and VBS are available in the SeeShell SeeShell API GitHub Repository. By design, the API can be used from any Windows programming or scripting language, including C++, Ruby, VB6, VB.NET and VBA.
objSeeShell = CreateObject ("SeeShell")
Example objSeeShell = CreateObject ("SeeShell").
Connects to the SeeShell Desktop Automation API. The API is technically designed as a COM object, so it works with any programming or scripting language on Windows. They all support talking to COM objects. Now you can access all commands via the “objSeeShell” object just created: intReturncode = objSeeShell.CommandName
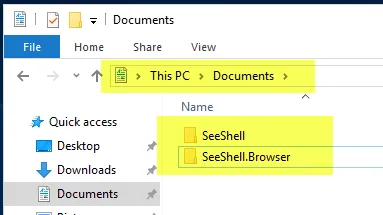
objSeeBrowser = CreateObject ("SeeShell.Browser")
Example objSeeBrowser = CreateObject ("SeeShell.Browser").
Connects to the SeeShell Browser API. The API is technically designed as a COM object, so it works with any programming or scripting language on Windows. They all support talking to COM objects. Now you can access all commands via the “objSeeBrowser” object just created: intReturncode = objSeeBrowser.CommandName
Open(true/false)
Syntax: iret = objSeeShell.open(true)
- open(true) - Opens the SeeShell browser.
- open(false) - connects to an existing, already open instance.
For experts: You can modify the default timeout that the API waits for SeeShell to launch by using objSeeShell.Open(true/false, new timeout value in seconds). The default timeout value is 60 seconds, which is normally more than enough to launch the SeeShell Browser. However, if you are launching many instances of SeeShell at once, and the CPU usage is close to 100%, then it can take for longer. The option to increase the .Open timeout was added for this case.
PROXY and user agent change: You can add a proxy parameter with objSeeShell.Open(true, 60, "-proxy 206.127.141.67:8888 -useragent helloWorld "). This feature is only available in the regular PRO version (not PRO trial).
objSeeShell.echo (“Text”)
Displays a text string in a yellow box on the SeeShell GUI. Try it :)
objSeeShell.setVariable (“VariableName", Value)
Set values in your programming language and SeeShell uses them in the see macros, for example ${VariableName} - the variable name inside SeeShell is the same one that you use inside the calling script. So this command allows you to create and fill custom variables in the calling script, for later use inside the SeeShell macro. Important: Variable names inside the .see macro files must be all lowercase. So the name should be, for example, "currentday" and not "currentDay".
"setVariable" should not be confused with the SET command inside the SeeShell macro, which is designed to set the built-in internal variables like ReplaySpeedMode, DeleteAllCookies, DownloadDirectory, FindImageCommandTimeout or SearchImageInWholePage.
Variables are only parsed in the “Value” field of a command. So you can not use them (yet) to replace/change, for example, the the confidence level of an image command. If you need this type of functionality, contact tech support for some workarounds, or ask in the forum.
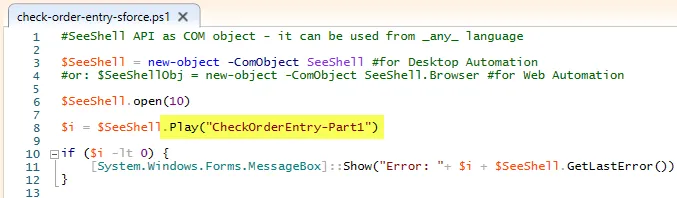
objSeeShell.Play("macro.see”)
This is the most important command - it plays the .see macro. If the macroseeshellkantuhowto completed OK, the command returns 1. If something went wrong a negative value is returned.
The GetLastError
function provides detailed error information on what went wrong.
Timeout value: Play and all other commands have a default timeout. This timeout avoids that the calling scripts
waits "forever" in case the Chromium browser engine crashes or freezes. If this happens, the Play command returns after the timeout is expired. If the SeeShell browser (and/or the Google Chromium engine inside it) is frozen, it is
closed by the API. So the API object operates independently of the SeeShell Browser. It runs in a separate process.
Important: The timeout might also trigger an error if the macro simply runs too long (longer than the timeout value). The solution for this case is to
overwrite the default timeout value (60 seconds) by adding your own time like this:
objSeeShell.Play ("macro-name", 300)
In this example the SeeShell API will wait 5 minutes (300 sec) for the PLAY command to complete before triggering a timeout error.
String = objSeeShell.getLastError()
Returns the error text of the last error that occurred. Typically this command is used after the Play command if the return value is < 0 (which indicates an error)
String = objSeeShell.GetExtractImageData()
Returns the extracted information as string. Each entry is separated by [DATA]. The command also returns information that is "manually" added as extracted information with the ExtractAdd command. A good example is the WebScraping Demo in the Github repo.
objSeeShell.Close
Closes the SeeShell Browser.
More Commands
These commands are for expert use and typically used if you need a deeper integration between your application and SeeShell.i = objSeeShell.searchImage(image, 0.38)
Runs an image search on the currently open browser window.
SeeShell API Error Codes
The SeeShell API reports back detailed error information whenever something goes wrong. Error codes in the -1 to -100 range belong to the API itself, while error codes below -200 are errors that happen inside the SeeShell Browser or SeeShell Desktop Automation (e. g. image not found error)-
| Error Code | Description |
|---|---|
| 1 | Macro completed ok |
| API related error codes typically happen if the API can not communicate with the SeeShell app for some reason (e. g. SeeShell is closed). | |
| -1 | -1 with Open command: Failed to start SeeShell |
| -1 | -1 with Play command: Timeout (= no answer from SeeShell within the timeout limit, you can increase the timeout limit with a second parameter like Play ("macro", 300) => 5 min timeout. Increasing the timeout is necessary of you have macros that run very long. |
| -10 | Application closed (happens e. g. if you close SeeShell but the scripts still runs) |
| -20 | No application found or created (specific to Open command) |
| Error codes below -200 are errors that happen inside SeeShell - the API only reports them back. | |
| -201 | SeeShell error - these are the errors that you also see in the red SeeShell error box. To get details on this error you can call GetLastError which returns the same text that you also see in the red error box. |
| -220 | User pressed Stop |
| -221 | App closed by user (e. g. by clicking on the "X" icon) |
| -800 | Macro file not found |
And if your question is not answered here,...
...please search or post in the SeeShell forum or contact us. We love to hear from you!
Top