Visual Automation, Visual UI Testing
UI.Vision RPA combines Visual UI Testing, Data-Driven Testing and Selenium IDE in one browser extension
This video shows how the visual automation works:
The visual UI testing commands VisualAssert, VisualVerify, VisualSearch and XClick/XMove allow you to write automated visual tests with UI.Vision RPA - so UI.Vision RPA has its own pair of "👁👁 eyes" now. A huge benefit of doing visual tests is that you are not just checking one element or two elements at a time, you’re checking a whole section or page in one visual assertion. The image comparison algorithms that we use are error-tolerant, and can ignore resolution, size and position differences.
The visual test commands take a screenshot of the page and search it against the provided image. If the algorithms find the image inside the screenshot, then visualAssert succeeds, otherwise it fails. You can supply a confidence value behind the @ symbol. Its value ranges from 1 (exact match) to 0.1 (almost everything matches). The visual test commands wait !timeout_wait seconds for the image to appear. If the image is not found, an error is triggered (you can overwrite this with !errorignore).
The difference between visualAssert, visualVerify, visualSearch, XClick and XMove is what happens if no image if found:
- 👁 visualAssert - Macro stops with error if no matching image if found.
- 👁 visualVerify - Macro logs warning if no image is found, but macro execution continues.
- 👁 visualSearch - The number of matches is filled into a variable, just like the sourceSearch command does. If no image if found, the number of matches is 0.
- 👁 XClick/XMove - XClick and XMove commands combine a visualAssert image search with a real-user mouse click. The mouse event hits the center of the found image, but it can also be sent to a position relative to it.
Tip 1: UI testing is especially helpful with responsive content at different viewport sizes to ensure changes made at one screen size won’t break a layout on another screen size. You can use the RESIZE command to resize the browser window to emulate various screen resolutions.
Tip 2: Because the visual checks wait for the image to appear, they are also useful for general web automation, and can visually make sure that a web page - or a certain part of it - is loaded and visible before proceeding. On complex websites, such a visual, human-like "page is loaded" check is often more reliable - and certainly easier to understand and implement - then the classic method to wait for the browser's page load event(s) to fire.
The image search runs 100% local in your web browser. It uses C++ powered computer-vision image processing, running directly in your Chrome and Firefox as WebAssembly code. The input images for the visual tests are stored in the "👁 Visual" tab:

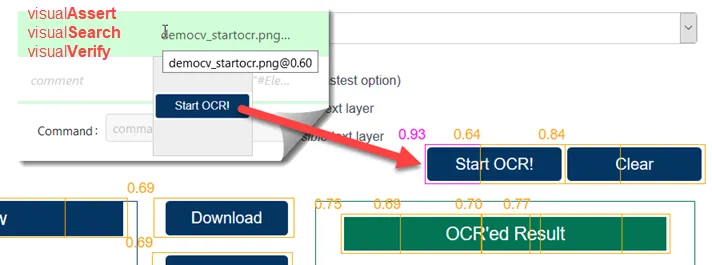
When you select a visual test command, the normal Selenium IDE "Select" and "Find" buttons turn into "👁 Select" and "👁 Find". "👁 Select" allows you to take new screenshots for use with visionFind, and "👁 Find" starts an image search. The found areas are marked along with their confidence value. The best match is marked with a pink frame.
At the top of the "👁 Visual" tab you find buttons to take screenshots, and export and import all images. And next to every image is the option to rename it, to add its name to the visual command in the table above (+ symbol), to view it in original size (👁 symbol) and to delete it.
visionLimitSearchArea (viewport/full/element:locator/area=x1,y1,x2,y2)
The visionLimitSearchArea allows you to change the search area from viewport (the part of the website that is currently visible in the browser) to full page. And with element:locator you can restrict the image search/comparison to a specific DOM element. This is especially useful for testing canvas elements like Google Maps, Youtube videos or e. g. seat reservation applets.
The above parameters are for web UI testing only. In web and desktop UI testing mode you ca restrict the search area with area=x1,y1,x2,y2:
With "area=" you define the new search area directly by the coordinates of the top left (x1,y1) and lower right (x2,y2) point of the rectangle. Of course, these coordinates can be the result of a previous image search, OCR text recognition or some calculations. The "DemoXDesktopAutomation" and "DemoXDesktopAutomation_OCR" macros that ship with UI.Vision RPA are a good example for calculating a new search area based on two previous image searches. In the "Sub_XDesktopAutomation_Area" macro the calculations use !imagex, !imageY, !imagewidth and !imageheight as input.
The screenshot that is used as input for the image search commands is available as "_lastscreenshot" in the screenshot tab. This can be useful for debugging, so you can see on what image the image search was done.
The visual restrictions apply to all visual commands: visualAssert, visualVerify, visualSearch, XClick (image), XClick (ocr=text) and XMove.
Related forum posts: How to ignore some parts of the website/desktop and element:locator explained
visionLimitSearchAreaRelative (image with green/pink boxes)
The visionLimitSearchAreaRELATIVE command allows you to change the search area by drawing it as pink box on an image. UI.Vision RPA first finds the image inside the green box, and then uses the coordinates of the pink box (relative to the green image) as the new search area. This works for web UI testing and desktop UI testing/automation.
Related forum post: Restrict search area
How to get the pixel color on the screen?
The visualGetPixelColor | x,y | var command returns the color value of a given screen position. This function is useful, for example, to check/extract the color of a status indicator icon, or to check if a certain icon is active or greyed out. The output is stored in the variable in hexadecimal red-green-blue (RGB) format (e. g. "#142467"). Technically this command uses the same logic and code as our open-source color picker extension. You can see the command in use in the DemoXClick macro. In this macro visualGetPixelColor is used to check the status of the pencil icon (active or not):
![]()
The video shows how to use visualGetPixelColor to wait until a button changes color.
Click on Elements with #elementFromPoint(${!imageX}, ${!imageY})
The coordinates of the center of the best found match are available in the internal variables !imageX and !imageY. Together with the elementFromPoint (x,y) function of the web browser, you can find out which element (locator) is at the image, and then use this locator as input for all commands that take a locator as input. For the most common use of elementFromPoint with the !imageX/Y we introduced a shortcut notation of just using #efp, which of course e-f-p stands for e_lement_f_rom_p_oint. This short video shows how to use #efp to click on an instagram like button:
Testing Canvas Elements
For UI testing and automating canvas elements you need to use ClickAt with elementFromPoint instead of Click. Only ClickAt can click on specific coordinates inside a canvas element. By contrast, Click #efp always clicks in the middle of the DOM element, and with a canvas element that means, it would always just click in the middle of it.
| Command | Target | Comment |
|---|---|---|
| visualVerify | (image name here) | This sets !imageX and !imageY if image is found |
| ClickAt | #elementFromPoint (${!imageX}, ${!imageY}) | comment: same as using #efp, see below: |
| ClickAt | #efp | shorthand notation |
| Type | #efp | elementFromPoint can be used with any command that takes a locator as input |
| ClickAt | #elementFromPoint (${anyOtherVariable}, ${var2}) | Here we need to full command as we use different variables as input. |
Note that the elementFromPoint function of the browser is not always reliable, on complex websites with overlapping elements it might return an element that can not receive a click. If you find such cases, report them to us in the forum, there are probably workarounds available.
Visual UI Test Example
Quite literally, seeing is believing. The best way to understand visionFind is to run the included DemoComputerVision macro. It is installed with every fresh UI.Vision RPA install and shows a visual test of the best online OCR website.
| Command | Target | Pattern/Text |
|---|---|---|
| open | https://ui.vision/ | |
| visualSearch | buttonImage | matches |
Example: If IMAGE do THIS
For more details see If IMAGE do THIS.
Works in
UI.Vision RPA for Chrome Selenium IDE, UI.Vision RPA for Firefox Selenium IDE, Firefox IDE Classic
Related Demo Macros
DemoCanvas, DemoComputerVision, DemoVisualUITest
See also
storeImage, storeText, Web Automation Extension User Manual, Selenium IDE commands, Classic Firefox Selenium IDE.
Anything wrong or missing on this page? Suggestions?
...then please contact us.